Create a Job
- To create a Single-Day Job first click on a date. The date will turn purple to show it's selected.

Selecting a date
- Either click the ADD JOB icon on the toolbar or click on the menu JOBS>NEW JOB.

Adding a new Job
Job Details Popin
You’ll see the Job Card visually start to build out and the Job Details Popin window will open. By default, this opens on the SETTINGS Tab when creating a new Job.

Settings tab
Settings Tab
Here you can give the Job a name. Enter the Primary Contact for the Job. You can override the default Job colour if you require. Click the NEXT button to proceed.

The Job Details tab
Roles Tab
A Role is the job function you require for that job. Click ADD ROLE to start the process.

ADD ROLE button
1. Role Details
- A second Popin will appear. Firstly, pick a ROLE TYPE.

Role details Popin
- Add START and END times.
- Set the FEE. This can be Hourly, Fixed or No Fee.
- Set PAID or UNPAID rate for the Break Period.

Start and end times, fee type, and break periods
2. Subsistence and Expenses
- Set Subsistence (if required): Subsistence is typically a small allowance for Crew to spend on the Job, eg. for food or travel. This will always be paid out on top of the salary.
- Set an Expense budget (if required): The Expense budget is something that a Crew member must upload a receipt for. A claim must then be submitted by the Crew for approval by Admin or it doesn’t get paid out.

Subsistence and Expenses
3. Crew Count and Role Description
- You can adjust Crew numbers here to indicate how many Crew of this Role Type you required.
- Add a role description if required. This information is only visible to Crew for this specific Role.

Crew required and Role Description
4. Job Board Visibility
- You can then decide if you want to display this Job on the Job Board or not.
- If set to NO: the Role will not be visible on the Job Board.
- If set to YES: the Role will be visible on the Job Board for all Crew and Crew will be able to apply to this Role.
- If set YES then you will have a second option appear.
- If this option is set to NO then the Role will disappear from the Job Board when it is full.
- If set to YES then the Role will remain on the Job Board when full and people can join a Reserve List.
 If I set it to NO the Role won’t display. If this option is set to NO then the Role will disappear from the Job Board when it is full. If set to YES then the Role will remain on the Job Board when full and Crew can join the reserve list.

Role Details tab
Job Board visibility indicator:
- A purple dot will appear next to a Role Type on the Job Card if that Role is set to be visible on the Job Board.
- No purple dot means it is not displayed on the Job Board.

A purple dot indicating this Role is visible on the Job Board
5. Adding Multiple Roles
- Click ADD ROLE to add additional Roles.

Adding multiple Roles
- Repeat the previous steps for each Role.

Multiple roles with separate info.
Requirements Tab
- Click the NEXT button within the Role Details tab to proceed to the Requirements tab if you wish to add Requirements for a Role.
- Select the Requirement type from the dropdown menu.
- Then select and/or search to add that Requirement.
- Click the X to close the Popin when you're finished with that Role.

This is a Requirement for the Role
Location Tab
- Click NEXT within the Job Details tab to proceed to the Locations tab.
- Locations use Google Maps.
- In the location box you can type a venue name, an address or a post/zip code.
- Be sure to select the location from the suggested list that appears otherwise the location will not save correctly.
- You can drag the pin to a meetup point if required.
- Add a short name. This is a more friendly version of the address.
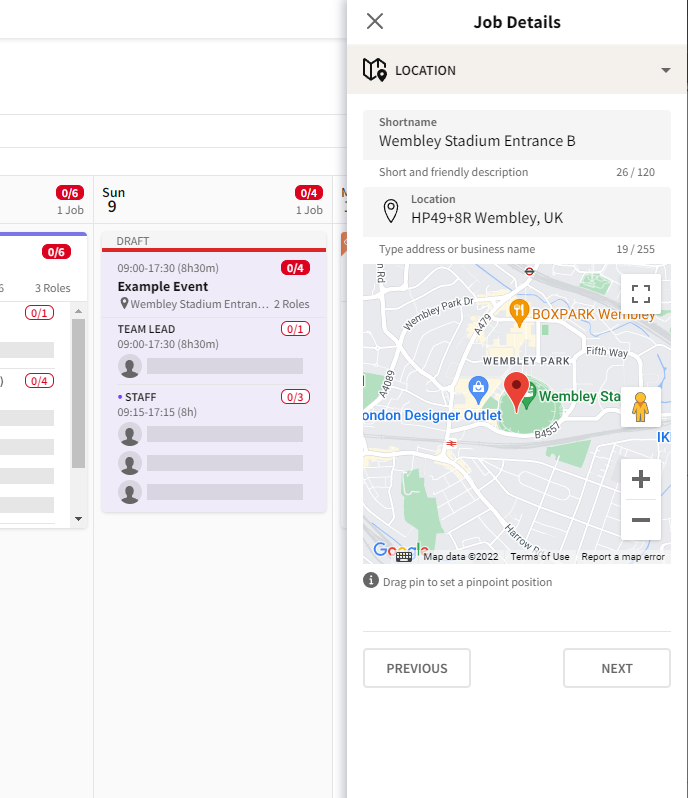
The Location tab uses Google Maps
The location of the map pin is important for two reasons:
- Distance from Job location: the pin will be used to show the distance from the Crew's home address to the location when you are reviewing Crew.
- Check-In feature functionality: if you have the Check-In feature turned on then this pin will be used to check Crew are within a certain radius of the Job using geolocation on the Crew's mobile device.

Crew distance from Job and Crew can click the Check In button anytime until the end of the job
Job Ad Tab
- Click NEXT within Job Details to proceed to the Job Details tab.
- Add any further briefing notes about the Job on this screen.
- Information added here is visible to all Roles.
- Post-Approval information and uploads are only visible to Crew that have been Confirmed onto the Role.